If you own an older graphics card or you need to refresh your newer graphics card, you should find out how to undervolt a GPU. Power demands can be reduced, temperatures can be lowered, and noise levels can be reduced.
overclock your graphics card. Given the ongoing shortages and exorbitant prices of hardware, running it harder and hotter is still a risky proposition.
By running your graphics card cooler, you may be able to extend its life. How would you feel if there was a way to do that with very little (or no) loss of performance? The GPU undervolting process makes this possible, and it’s surprisingly straightforward.
The GPU undervolting method makes your graphics card cooler and last longer.
It can be done in a few easy steps after you have a few basic understandings of how undervolting works. Read on to learn how to undervolt a GPU.
Table of Contents
Before you start
Prior to undervolting, be mindful that not all GPU models should (or can) be undervolted. It may not be possible on models older than Nvidia’s 10 series. The Nvidia GTX 10xx series are locked to voltages until the Pascal series is launched. Undervolting tools for these cards aren’t widely supported due to this. It’s possible to workaround this problem, but they’re often more complicated than with newer cards.
Even older AMD cards are commonly undervolted. Certain AMD models, like the Vega series, actually increased their clock speeds when running at lower voltages since they had additional power and temperature headroom.
How to undervolt an Nvidia graphics card
It is more difficult to undervolt Nvidia GPUs than AMD. We will look at them all below.
Step 1: Download the MSI Afterburner software
 Undervolting Nvidia graphics cards is most commonly achieved with MSI Afterburner. To get started, get the free program here.
Once it has been installed, launch it.
Step 2: Launch the Curve Editor
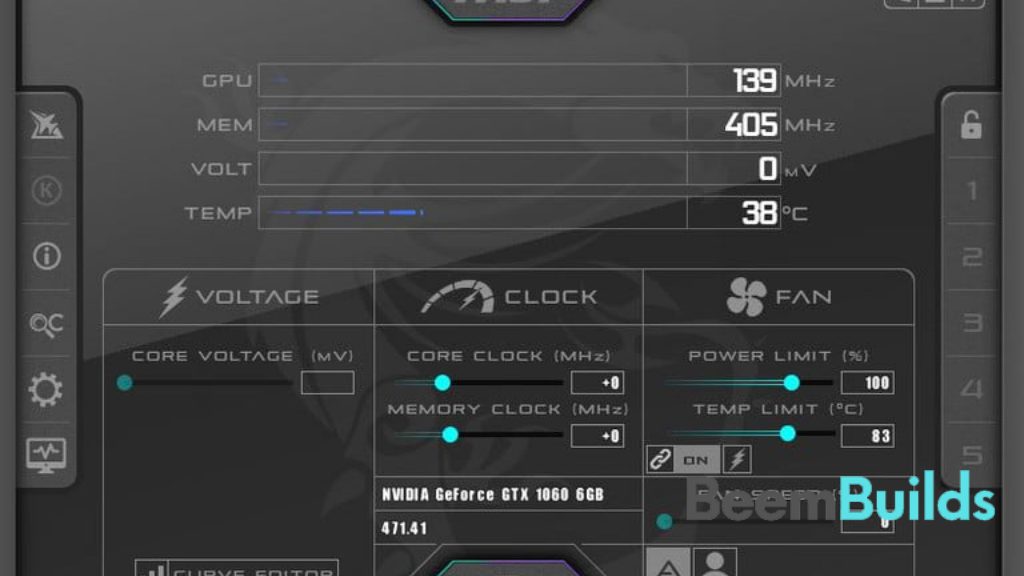
The voltage of your GPU can be found in the lower left corner of the MSI Afterburner interface. You can access the curve editor below that. Using the CTRL + F shortcut or double clicking will allow you to find it.
You will see a (fairly intimidating) graph once the Curve Editor has been opened.
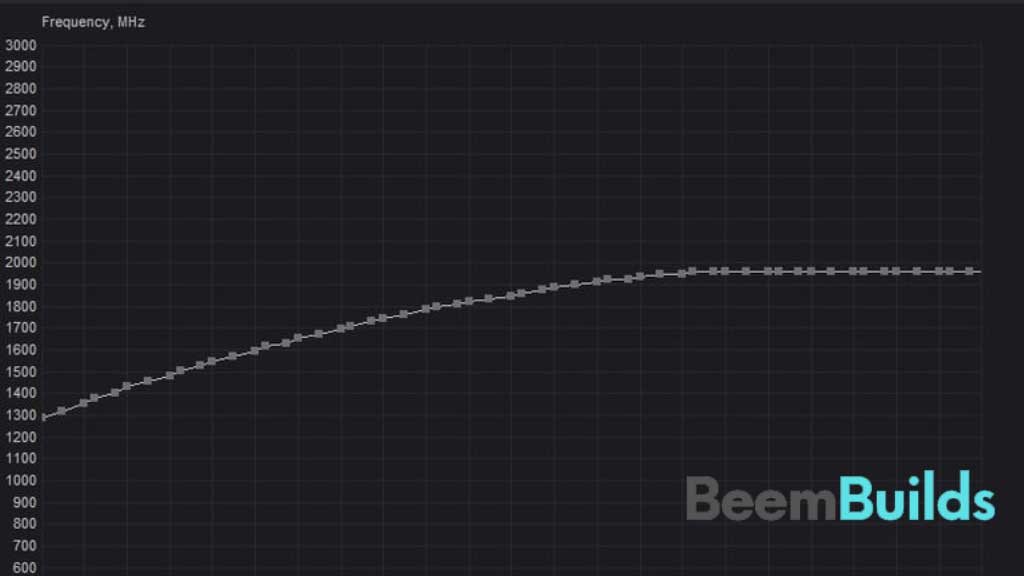 Two important facts are displayed in this graph. A graphics card’s voltage is represented on the X-axis, while its frequency is indicated on the Y-axis.
Step 3: Test the graphics card
You must first determine the frequency at which your GPU runs under stress before you can take any further steps. This can be achieved in two ways: by launching a GPU-intensive application or by running a stress test, such as FurMark.
To see the best results with resource-intensive games, let them run for at least 15 minutes. Many newer titles use the GPU to show the proper frequency – particularly at higher resolutions – as many games are more based on the processor than on the graphics card.
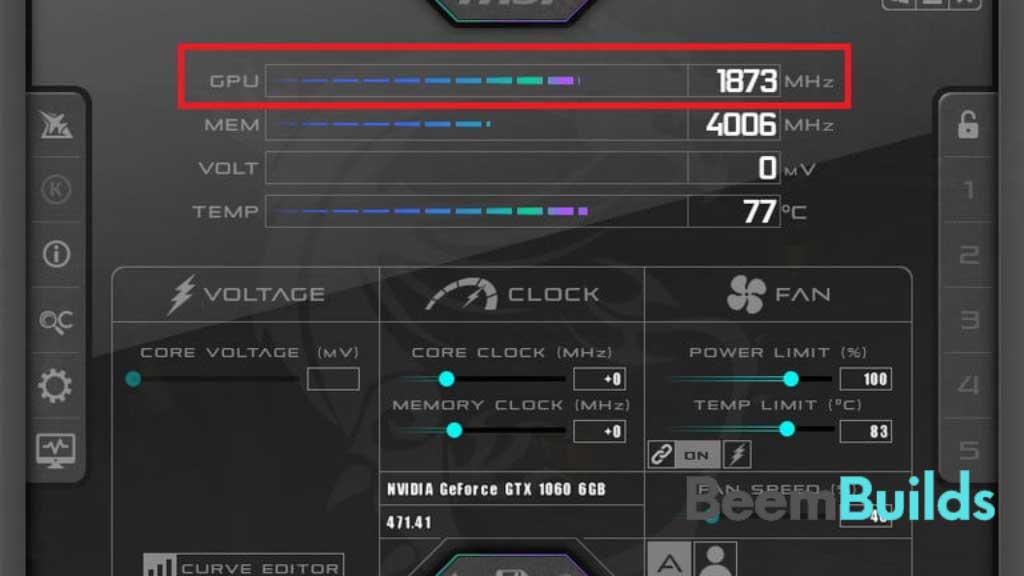 Once MSI Afterburner has been launched, you will be able to see the program in windowed mode. In this example, it was 1873MHz. Look at the section labelled “MHz” and remember that number.
Step 4: Locate the axis using the Curve Editor
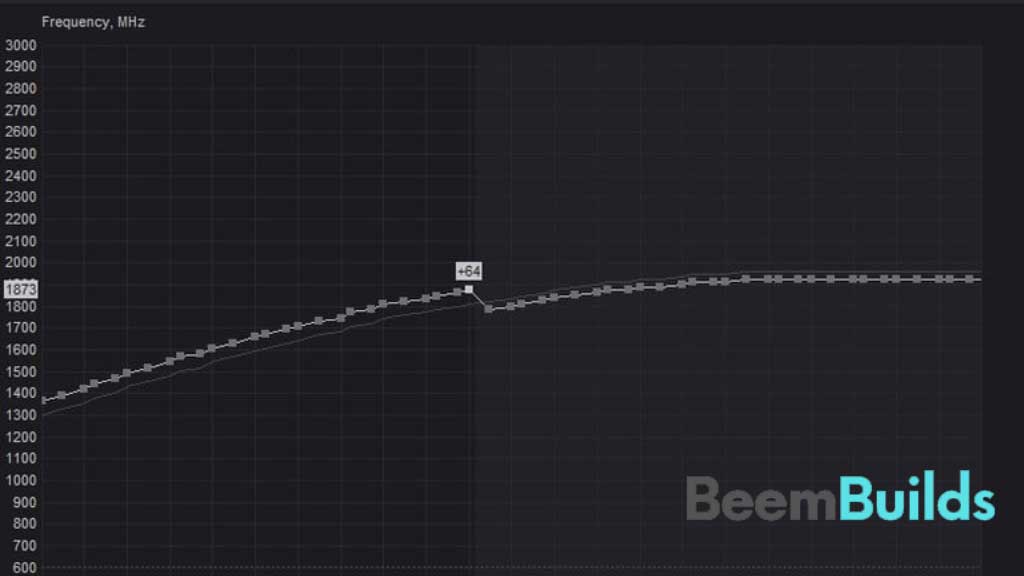
Afterburner’s Curve Editor tool can be used to find the right frequency. By clicking along the dotted curve line at the left hand side, you can locate the correct frequency.
Check the voltage corresponding to the voltage you see down below. The core voltage for the 1873MHz processor is 1000V.
Step 5: Select the voltage you want
Overclocking and undervolting are not exact sciences. Rather, they are experiments. If you have a frequency of 1873MHz and a voltage of 1000mV, you may want to lower the voltage step by step to 950mV. Your graphics card will determine what these numbers are. If you want to undervolt slightly at a time, it’s better to do it gradually rather than all at once.
Voltage can be selected. Since that number is tied to a lower frequency than you want to maintain, you will have to reduce it. You can fix it in several ways.
Step 6: Change the core clock
Check out the Core Clock (MHz) section in the main window of MSI Afterburner. If you want to maintain a certain voltage, you have to adjust your core clock.
Increasing the core clock will cause the curve in the Curve Editor to change. On the left, track the frequency and the voltage you’ve chosen (in this case, 950 mV). As you increase the clock, your frequency will match the frequency you had while running on the new, lower voltage.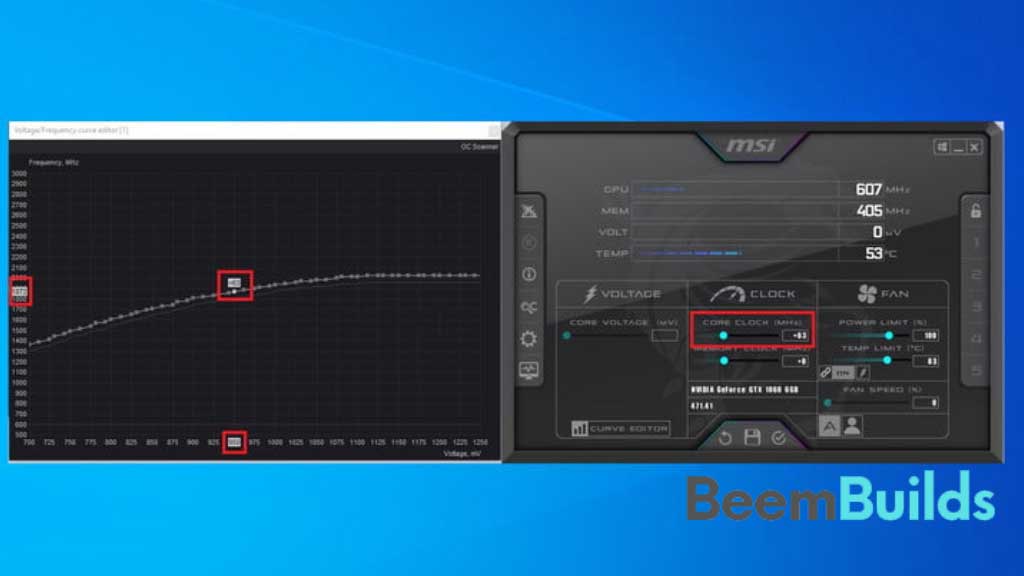
As a result, you should keep your card running at the same frequency while maintaining the maximum voltage you choose. The numbers you start with will determine what the numbers you end up with.
Step 7: Maintain the processor’s voltage and speed
After successfully changing the voltage and clock frequency of your graphics card, it is time to ensure that you do not go over your intended values. Close Curve Editor and open it again.
Click on the voltage you want once again. You can start dragging down the small squares in the highlighted area from the voltage point you selected. Make sure your line is aligned with the frequency your graphics card has been hitting. Alternatively, keep the last part of the curve below your highest frequency point if you can’t.
 With that clock speed, performance should be stable.
Step 8: Update and save
Keeping these changes is as simple as returning to the MSI Afterburner window and pressing the Save floppy disk icon located at the bottom.
Run the same game (or other resource-intensive program) that you ran before on your new frequency/voltage combination. Verify that your MSI Afterburner values are the same as they were before you undervolted your card. This could be due to a low core clock. In that case, you might want to increase the core clock a bit more.
The game should be allowed to run for at least 30 to 60 minutes. If everything runs smoothly, your graphics card does not cause any problems, and nothing crashes, you are in good shape. Feel free to try re-doing a few of the steps to further lower the voltage if you’re feeling adventurous.
It is possible, however, to undervolt your graphics card too much if you are experiencing any type of graphic problems or crashes. In this situation, restore the voltage and keep the clock speed the same while re-performing the steps. Your graphics card will eventually find the best spot for itself.
Step 9: Put the card to the test
It can be considered an additional step, but it is highly recommended. It is a good idea to put your new settings through a stress test so you can verify they will work as well under any conditions. You can also stress the card by using programs instead of playing games.
Three times should suffice to stress test or benchmark the system with FurMark or 3DMark Time Spy. You will be successful if everything works after learning how to undervolt a GPU.
How to undervolt a GPU
Nvidia graphics cards are much harder to undervolt than AMD graphics cards. The Radeon GPU’s drivers already include all the tools you need for this process, so you won’t have to download any additional programs.
Step 1: Go to Radeon’s control panel
Radeon Wattman, located within the Radeon Control Panel, should be available to all AMD Radeon graphics card owners.
The control panel can be accessed through the right-click menu. In the drop-down menu, select Radeon Control Panel.
Step 2: Launch Radeon Wattman
However, there will be differences in the look and feel of your Radeon control panel depending on your GPU and driver. The screenshot below shows what your Radeon control panel should look like.
Locate the Gaming section and click it somewhere on the screen. You will then be directed to Global Settings, before reaching Global Wattman.
AMD may prompt you to accept a warning before continuing. It explains what AMD will do if any damage occurs to the card while overclocking, and what happens to the warranty.
To launch Radeon Wattman, click Accept after reviewing the warning.
Step 3: Determine the GPU’s optimal frequency
With Radeon Wattman, we’ll map the optimal clock speed and voltage of the Radeon card much like we did with Nvidia. Navigate to the Tuning Control section in the Wattman interface.
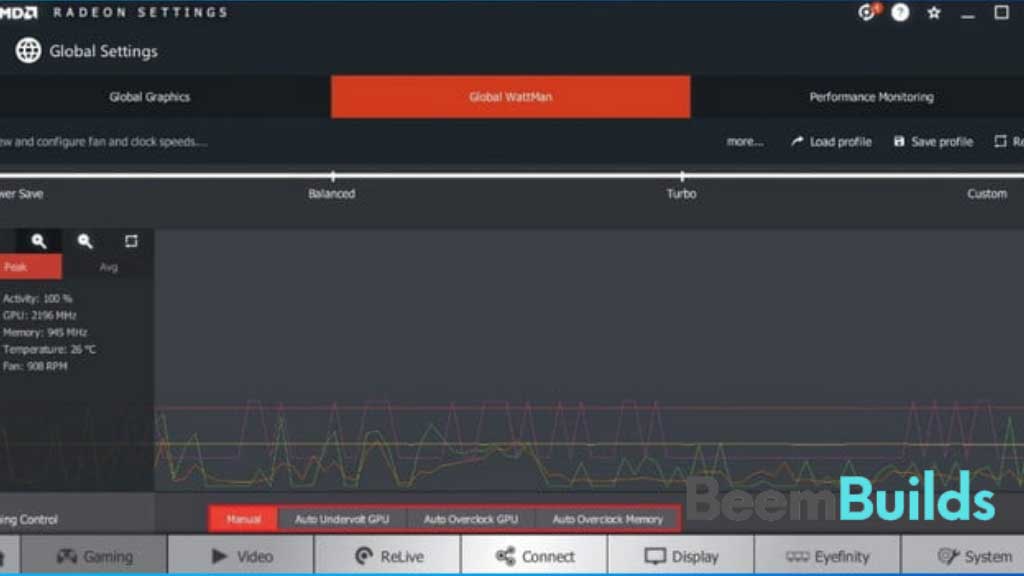 Launch a resource-consuming program, such as a new game or utility such as FurMark that tests GPU performance. Let Radeon Wattman remain open in the background while the program runs for at least 15 minutes. On the left hand side of the screen, note the numbers next to the GPU. Take note of both the peak and average core speeds (in the example above, 2196MHz).
You can also auto undervolt your GPU using the Tuning Control interface. Though you can try it, it’s safer to do it by yourself.
Step 4: Vary the voltage and frequency
The Frequency/Voltage section can be found by selecting the Global Wattman icon. Select Manual from Auto.
Your graphics card’s mV and MHz values will be displayed on this screen using a curved line. By lowering the voltage and frequency, you can undervolt your GPU.
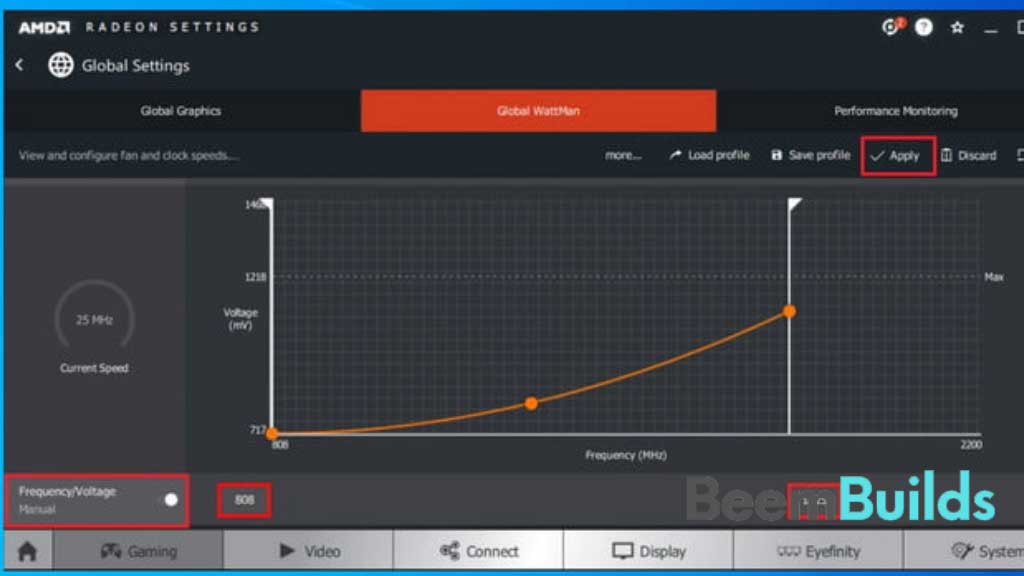 Within each vertical line there is a dot representing voltage, and two white bars representing clock speed on each side.
If your card is able to hit the maximum voltage at your desired frequency, undervolt your card by dragging the Voltage value below it. With the frequency of 1825MHz and the voltage of 808mV in this example, a frequency of 1825 MHz was used.
Start with a lower voltage. The new values may be entered in the boxes at the bottom of the screen if you do not want to use the dotted and curved lines. Depending on your settings, you may have to try different voltages until you achieve the same frequency as before.
Once you have reached your desired result, click Apply.
Step 5: Test the graphics card
Even though the undervolting process has ended, it’s important to test the system’s long-term stability. Another stress test is the only way to determine what needs to be done.
There are a few ways to accomplish this, and it’s recommended that you try more than one method. Play your favorite game for an hour. Additionally, run FurMark or 3DMark Time Spy to test the GPU. Keep them running for a few minutes.
The GPU has been undervolted once the stress tests have been successfully completed without crashing.
You can go back and do it again if you want to further undervolt it. When your GPU crashes or has issues, you need to increase the voltage or decrease the clock speed until the problems go away.
Here’s another recommendation: Use HWiNFO for monitoring graphics cards
MSI Afterburner and AMD Radeon Wattman deliver general GPU information. The best method for real-time monitoring of the GPU is HWiNFO.
As soon as you run the program and install it, you’ll receive a lot of information about your computer. Top-right corner of the screen displays the graphics card’s clock speed.
 Run the game and take notes on the frequencies your cards hit so you can get accurate numbers for undervolting. Pick the highest value. In addition to testing whether or not your undervolting worked, this program can also be used to determine whether or not the frequencies match on a benchmark or game.